How to Integrate IntaSend with Your WordPress Website for Seamless Payments
IntaSend is a powerful payment gateway that simplifies online transactions for businesses. Whether you’re running an e-commerce store, a subscription service, or offering digital downloads, integrating IntaSend with your WordPress website allows you to accept payments securely and efficiently. In this guide, we’ll walk you through the steps to integrate IntaSend with your WordPress website.

Why Use IntaSend for Payments?
IntaSend offers several benefits that make it an ideal payment solution:
- Multiple Payment Options: Accept payments via credit/debit cards, mobile money, and bank transfers.
- Security: IntaSend ensures secure transactions with advanced encryption.
- User-Friendly Interface: Easy to set up and manage.
- API Support: Customizable for developers.
- Real-Time Notifications: Keep track of payments as they happen.
Step-by-Step Integration Guide
1. Sign Up for an IntaSend Account
Before integrating IntaSend with WordPress, you need to create an account:
- Visit the IntaSend website and sign up for a business account.
- Complete the verification process to activate your account.
2. Install and Activate the IntaSend Plugin
- Log in to your WordPress admin dashboard.
- Navigate to Plugins > Add New.
- Search for “IntaSend Payments.”
- Click Install Now, then activate the plugin.
3. Configure the IntaSend Plugin
- After activating the plugin, go to Settings > IntaSend Payments in your dashboard.
- Enter your IntaSend API keys:
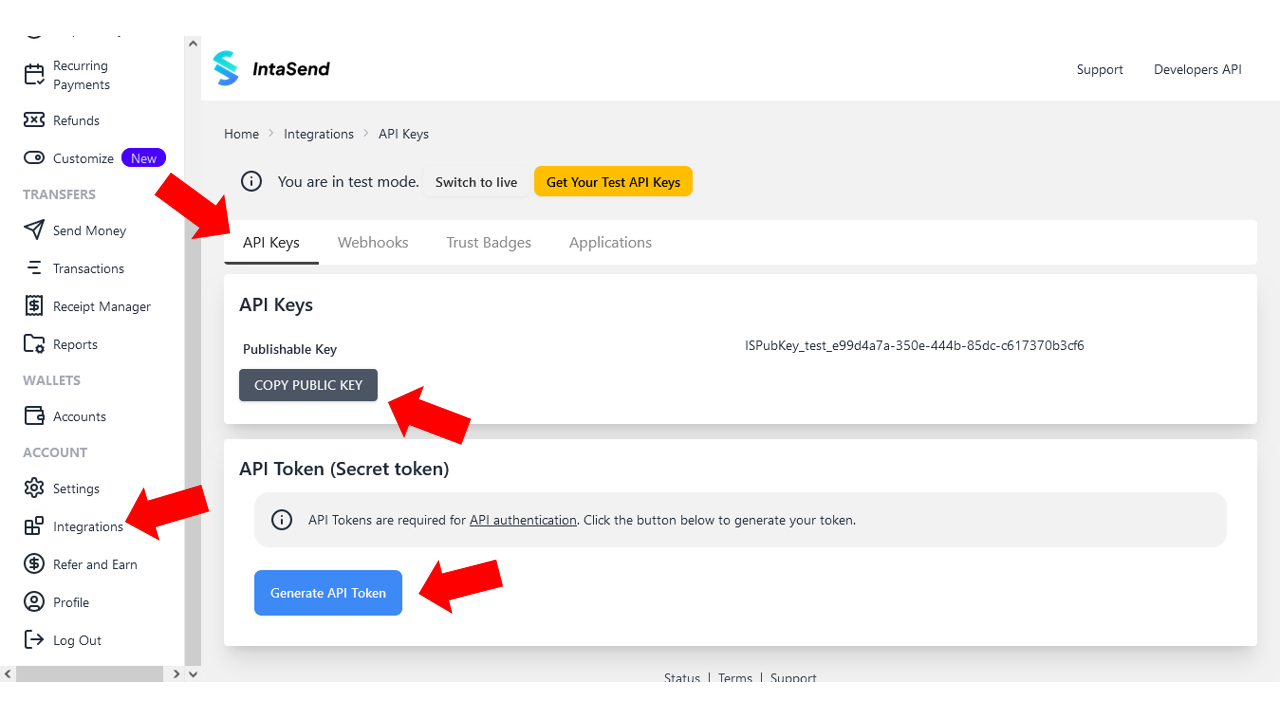
- Obtain these keys from your IntaSend dashboard under the “API Keys” section.
- Copy and paste both the Public Key and Private Key into the corresponding fields.
- Configure additional settings:
- Payment Methods: Enable or disable options like card payments and mobile money.
- Currency: Set your default currency (e.g., USD, KES).
- Payment Page: Customize the checkout experience.
- Save your settings.
4. Integrate IntaSend with WooCommerce
If you’re using WooCommerce to manage your store, follow these additional steps:
- Go to WooCommerce > Settings.
- Navigate to the Payments tab.
- Enable “IntaSend Payment Gateway.”
- Configure the gateway by entering the necessary details, including your IntaSend API keys.
- Save changes.
5. Test the Integration
To ensure everything works as expected:
- Enable Test Mode in your IntaSend plugin settings.
- Perform a test transaction on your site.
- Check your IntaSend dashboard to confirm the transaction was recorded.
- Disable Test Mode for live payments.
Best Practices for IntaSend Integration
- Secure Your API Keys: Never share your API keys publicly.
- Enable SSL: Use an SSL certificate on your WordPress site to ensure secure connections.
- Regular Updates: Keep your WordPress plugins, themes, and core updated to avoid compatibility issues.
- Monitor Transactions: Use IntaSend’s real-time notifications to stay updated on payment activity.
Conclusion
Integrating IntaSend with your WordPress website is a straightforward process that enhances your ability to accept secure and diverse payment options. With its robust features and ease of use, IntaSend is a great choice for businesses looking to scale their online presence.
Start accepting payments on your WordPress site today and enjoy the seamless experience IntaSend offers!
If you have any questions or need further assistance, feel free to leave a comment below!
For more information you can visit their documentation here Intasend
Authentication
How to authenticate your API requests and API Keys
Requests to IntaSend requires authentication. IntaSend provides two types of keys
- Public/Publishable Key (Prefixed with ISPubKey_)
- Private/Secret Key (Prefixed with ISSecretKey_)
The keys are unique for every account and also indicates the environment from which it was obtained. The environments are test and live.
Test keys (with keyword **test**) are for use in the sandbox environment while the ones with **live** keyword strings must be used only in live environment.
❗️You must secure the secret key at all cost
Secret keys must only be added at the backend and should not be exposed on the frontend. If your integration does not need use of secret key e.g the checkout link API which needs only the public key to generate, we recommend that you do not generate the secret key.
The Secret key must never be shared and must be stored securely. We recommend using 12 Factor App concept, where sensitive information like the Private/Secret key must be kept in an environment variable and not hard-coded in the configuration files.
How to generate the API Keys
The API keys are obtained on your dashboard. The public key is readily available while the secret key must be generated and only if needed. Please check the API you are working with to verify if it needed the secret key to complete the authentication.
Public/Publishable Keys are safe to add at the frontend of your app/website. The publishable keys are only used to identify your business during the checkout links setup. The secret keys are able to do more i.e refunds, send money, create wallets etc.
All the above keys can be found under your account integrations – settings – API Keys tab, sandbox environment, live environment
How to authenticate your requests (REST API)
When sending requests that requires authentication, the secret key is needed.
To authenticate your request, send the secret key in the Authorization header with the Bearer PrefixHTTP
POSThttps://payment.intasend.com/api/v1/[protected-resource]Authorization: Bearer [ADD-YOUR-SECRET-KEY]In order to protect your account, we recommend requests to IntaSend and your servers must be secure and encrypted (HTTPS).
Authentication for Node, PHP, Python and other libraries
When working with the IntaSend’s SDK tools, authentication process has been simplified for you. You simply need to provide your secret token and you are good to go. Here are code examples on how to authenticate (Libraries and SDKs) .


